General
Mold Removal & Damage Restoration Idaho
Mold in your home can cause serious health risks and structural damage if left untreated. Whether from a small leak or flooding, mold requires immediate attention. In this guide, we’ll walk you through the mold removal and damage restoration process, including when to seek professional help and what you can do yourself.
Understanding Mold Growth and Risks
Mold thrives in high humidity and damp environments, often caused by water leaks, or poor ventilation. It can grow quickly, damaging walls, ceilings, and floors. More importantly, mold can cause health problems like respiratory issues, allergies, and, in extreme cases, long-term complications. Recognizing mold early and addressing the source of moisture is key to preventing further spread.
Mold Removal: The Remediation Process
1. Assessment and Preparation
The first step in mold remediation is a thorough inspection of the affected area. Professionals will document the mold situation through photos, videos, and reports, then develop a detailed remediation plan. This plan outlines the scope of work and the level of contamination.
Containment Setup is critical to prevent mold spores from spreading to unaffected areas. This involves sealing off rooms with plastic sheeting, setting up air scrubbers with HEPA filters to clean the air, and ensuring the contaminated area is isolated. Personal protective equipment is also used by workers to ensure safety.
2. Removal and Cleaning
Once the mold is contained, the next step is to remove affected materials. Porous items such as drywall, insulation, and carpets that cannot be cleaned are disposed of properly. Non-porous surfaces are cleaned using EPA-approved solutions, and techniques like wet wiping or abrasive blasting may be used for stubborn areas. HEPA vacuums are then used to eliminate mold spores and ensure thorough cleaning.
Mold Damage Repair Process
1. Drying and Moisture Control
After mold removal, addressing the moisture problem is essential to prevent recurrence. Any leaks or water sources are repaired, and dehumidifiers and fans are used to remove any remaining moisture. Monitoring humidity levels during this phase ensures the space is completely dry before moving forward.
2. Restoration and Prevention
Once the area is dry, the damaged materials are replaced with new, clean building materials. This could involve replacing drywall, flooring, or insulation. Additionally, professionals may apply mold-resistant paints or sealants to prevent future growth. Improving ventilation, controlling humidity, and using moisture barriers can help reduce the chance of mold returning.
Final Inspection and Testing
Once mold remediation and restoration are complete, professionals conduct a final inspection to ensure the process was successful. They’ll check for remaining mold, monitor moisture levels, and test air quality to ensure all mold spores have been removed. After the inspection, they’ll provide recommendations to help you prevent future mold growth, such as fixing leaks, improving ventilation, and using dehumidifiers in high-humidity areas.
Costs and Insurance Considerations
The cost of professional mold remediation varies depending on the extent of the damage. Small mold issues may cost a few hundred dollars, while larger infestations could cost thousands. Homeowners’ insurance may cover mold removal if the damage came from something like a burst pipe, but not for mold resulting from neglect or ongoing moisture problems.
DIY Mold Removal: Is It an Option?
For small mold problems covering less than 10 square feet, DIY removal may be an option. However, it’s important to take the right precautions.
Safety First: Wear gloves, masks, and goggles to protect yourself from mold spores. Fix the source of the moisture first to prevent mold from spreading further. For cleaning, use mold-killing solutions, such as bleach or vinegar, on the affected areas.
After cleaning, thoroughly dry the area using fans or dehumidifiers to ensure all moisture is removed. If the mold returns or spreads, it’s best to call a professional.
Conclusion
Mold removal and damage restoration can be complex, but addressing it early can prevent costly repairs and health risks. While some small mold problems can be tackled DIY, larger infestations require professional expertise to ensure complete removal and safety. Don’t wait—take action today to protect your home and your health.
How To Dry Wet Carpet
Wet carpets can cause significant issues if not dealt with quickly. Letting water sit on your carpet can lead to mold growth, unpleasant odors, and even structural damage to your floors. This post walks through the steps for drying your carpets effectively and preventing further problems.
Identifying the Source of Water
Before starting the drying process, it’s crucial to identify where the water is coming from. Whether it’s a burst pipe, a leak, or flooding, stopping the source will help prevent further damage. Turn off the power in the affected areas to avoid electrical hazards.
Understanding Water Damage Categories
Water damage falls into three main categories:
- Category 1 (Clean Water): This comes from broken supply lines or faucets. It’s clean but still needs to be dealt with quickly.
- Category 2 (Gray Water): This water contains some contaminants, like from washing machines or dishwashers. It poses a higher risk than Category 1 water.
- Category 3 (Black Water): Highly contaminated water, such as sewage or floodwater. It poses serious health risks and should always be handled by professionals.
Step-by-Step Guide to Drying Wet Carpet
Step 1: Remove Excess Water
Start by removing as much water as possible using a wet/dry vacuum. If the area is smaller, you can use absorbent towels to soak up water manually.
Step 2: Create Airflow
Good air circulation is essential for drying. Use high-velocity fans or air movers to help speed up the drying process. Opening windows can also help create airflow, but make sure that the fans direct moist air out of the room.
Step 3: Use a Dehumidifier
High humidity will slow the drying process, so using a dehumidifier is a great way to speed things up. Dehumidifiers pull excess moisture from the air, making it easier for the carpet to dry faster.
Household Products to Aid in Drying
Baking Soda for Moisture and Odor
Baking soda can help absorb both moisture and odors. Sprinkle it generously over the wet carpet and leave it for at least 24 hours. Afterward, vacuum up the baking soda to remove any residual dampness and odors.
Preventing Mold
Mold can grow within 24 to 48 hours of your carpet getting wet. Once mold begins to grow, it can damage the carpet and padding and cause health problems. To prevent mold, dry the carpet as quickly as possible, create airflow, and reduce humidity using a dehumidifier.
When to Call a Professional
Sometimes, it’s best to leave the drying process to the professionals. Calling a professional water damage remediation service is a good idea if you’re dealing with large areas, prolonged exposure, or contaminated water. They have specialized equipment and expertise to ensure the area is thoroughly dried and cleaned.
Carpet Padding and Subfloor: Critical Areas to Check
It’s essential to check beneath the carpet after drying it. The carpet padding often retains water and can become a breeding ground for mold. In most cases, it’s best to replace the padding entirely. Also, the subfloor should be inspected to ensure no lingering moisture could cause structural damage.
FAQs About Drying Wet Carpets
- How long does it take to dry wet carpets? Depending on the extent of the water damage, carpets can take anywhere from 2 to 7 days to dry completely, especially if proper ventilation and dehumidification methods are used.
- Can I use a steam cleaner on wet carpets? Steam cleaners can sanitize the carpet, but you must ensure that the cleaner extracts moisture rather than pushing water deeper into the padding.
- What are the signs of mold growth in wet carpets? Musty odors, discoloration, and allergy-like symptoms in household members can indicate mold growth.
- Is it safe to leave wet carpets to dry naturally? Allowing carpets to air dry without intervention can lead to mold and mildew growth especially underneath, causing further damage and potential health risks.
Basement Water Damage Repair: What to Do, What It Means, and How to Fix It
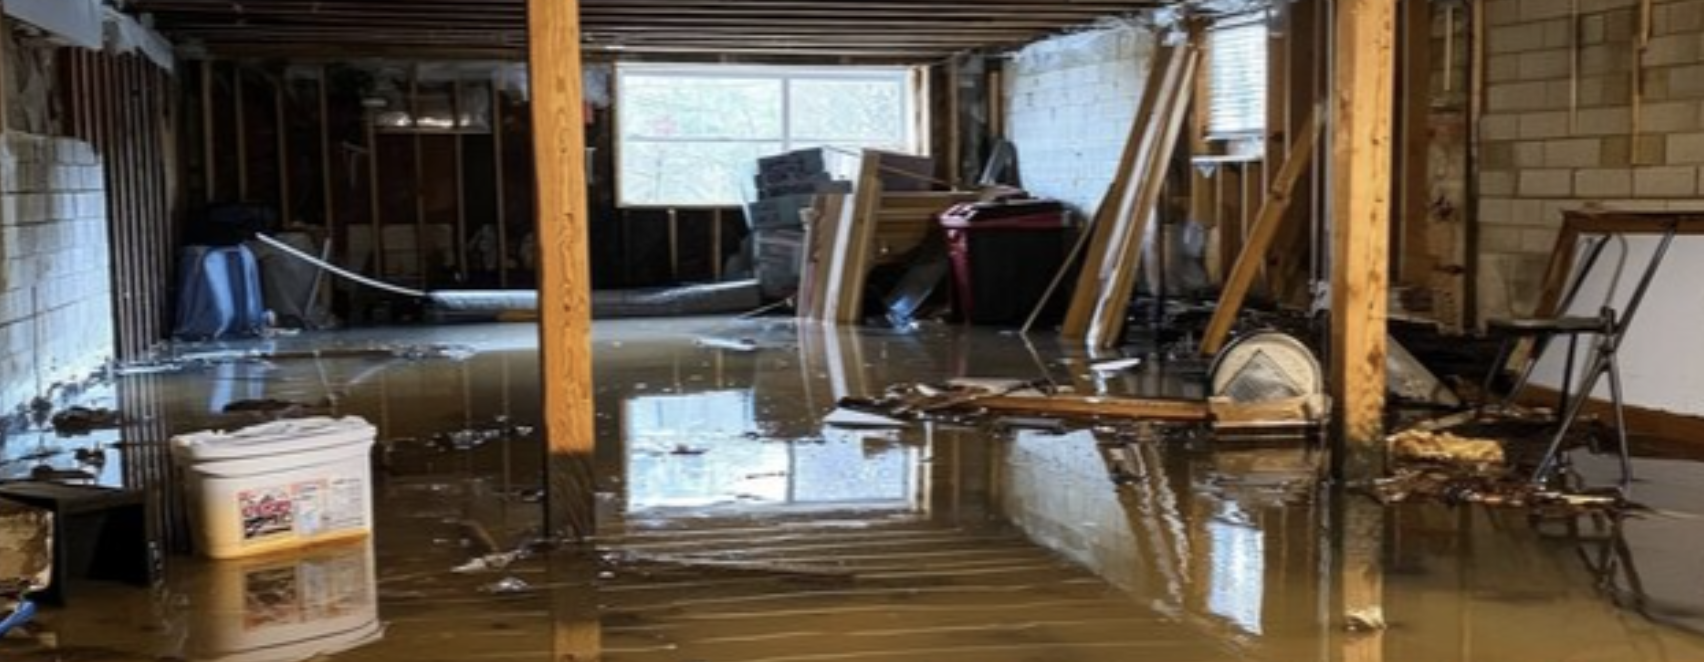
If you’re searching for basement water damage repair, something already went wrong. Maybe water is still present, maybe it just receded, or maybe you’re staring at soaked carpet, stained walls, or a musty smell that wasn’t there yesterday.
The good news: basement water damage is usually repairable.
The bad news: what you do in the first 24–48 hours determines whether this is a cleanup or a much bigger rebuild.
This guide walks you through what caused the damage, what to do immediately, what “repair” actually involves, and when it’s time to bring in professionals.
What Causes Basement Water Damage?
Most basement water damage comes from one of these situations:
Burst or Frozen Pipes
Common in winter or older homes. Water can spread fast and soak walls, flooring, and insulation before it’s noticed.
Sump Pump Failure
If the pump fails during heavy rain or a power outage, water can flood the basement quickly.
Heavy Rain or Groundwater Seepage
Water enters through foundation cracks, window wells, or poorly graded soil around the home.
Sewer or Drain Backup
Floor drains or toilets overflow due to blockages or overwhelmed municipal systems. This is one of the most serious scenarios.
Water Heater or Appliance Failure
A ruptured water heater, washing machine hose, or utility sink can release a surprising amount of water.
Identifying what caused the damage matters because it affects safety, cleanup methods, insurance coverage, and how repairs are handled.
First Things First: Safety and Immediate Actions
Before worrying about repairs, protect yourself and your home.
-
If water is near outlets or appliances, shut off electricity to the basement
-
Do not walk through standing water if power may still be on
-
Wear gloves and boots, especially if the water may be contaminated
-
Keep children and pets out of the area
-
Stop the source of water if possible (shut off supply, stop appliance use)
Avoid trying to “push through” the cleanup if there’s any safety risk.
What Basement Water Damage Repair Actually Means
Many people think repair just means drying things out. In reality, proper basement water damage repair usually involves several steps:
-
Water extraction (removing standing water)
-
Structural drying (floors, walls, framing, concrete)
-
Removal of damaged materials (carpet, padding, drywall, insulation)
-
Cleaning and sanitizing affected areas
-
Mold prevention or remediation, if needed
-
Rebuilding or restoration (drywall, flooring, baseboards)
Important distinction:
-
Cleanup removes water
-
Repair restores the structure safely
-
Restoration puts the space back together
Skipping steps often leads to mold, odor, or repeat damage.
What Kind of Water Are You Dealing With?
This is one of the most important questions — and most homeowners don’t realize it matters.
Clean Water
-
Burst pipes
-
Appliance leaks
-
Water heater failures
Lowest risk if addressed quickly.
Gray Water
-
Washing machine overflow
-
Sink or shower backups
Contains contaminants and requires disinfection.
Black Water
-
Sewer backups
-
Toilet overflows
-
Floodwater from outside
This is a health hazard. Porous materials usually must be removed, and professional cleanup is strongly recommended.
The dirtier the water, the more aggressive the repair process needs to be.
Why the First 24–48 Hours Matter So Much
Water damage gets worse with time, even if the water is gone.
-
Mold can begin growing in 24–48 hours
-
Drywall and insulation trap moisture behind walls
-
Concrete can stay wet for weeks
-
Odors can become permanent
-
Insurance claims can be affected if mitigation is delayed
Fast action often saves money and prevents long-term problems.
Can You Handle Basement Water Damage Yourself?
DIY May Be Reasonable If:
-
The water was clean
-
The affected area is small
-
The damage was caught immediately
-
No drywall, insulation, or framing is wet
Professional Repair Is Needed If:
-
Sewage or drain backup is involved
-
Water soaked walls or ceilings
-
Standing water remained longer than 24 hours
-
You notice musty smells or discoloration
-
Mold is visible or suspected
-
The source of the water isn’t clear
Trying to “wait it out” is one of the most common and costly mistakes.
Insurance and Cost Considerations
Insurance coverage depends on the cause:
-
Sudden pipe bursts are often covered
-
Groundwater flooding usually requires flood insurance
-
Sewer backups are covered only if you have a rider
-
Slow leaks are often denied
Important tips:
-
Document damage with photos and videos
-
Start mitigation immediately
-
Save receipts
-
Don’t throw items away before documenting them
Delays can reduce or complicate claims.
How Long Basement Water Damage Repair Takes
Timelines vary, but generally:
-
Water extraction: same day
-
Drying: 3–7 days
-
Material removal: 1–3 days
-
Repairs/restoration: days to weeks, depending on severity
Sewage contamination, mold growth, or structural damage can extend timelines.
Preventing Basement Water Damage in the Future
Once repairs are complete, prevention matters.
-
Inspect and maintain sump pumps (add battery backup)
-
Improve exterior drainage and grading
-
Seal foundation cracks
-
Install a backwater valve
-
Use a basement dehumidifier
-
Address recurring moisture issues early
Repairing damage without fixing the cause often leads to repeat problems.
When to Get a Professional Inspection
Consider an inspection if:
-
You’re unsure how far water traveled
-
Walls or floors feel damp days later
-
Odors persist
-
You want documentation for insurance
-
The basement floods repeatedly
A proper assessment looks beyond what’s visible.
Common Questions About Basement Water Damage Repair
How fast does mold grow after water damage?
Often within 24–48 hours in damp conditions.
Can concrete dry on its own?
Eventually, but it can stay wet for weeks without proper drying.
Is basement flooding always expensive to fix?
Not if addressed quickly — delays drive up costs.
Can you paint over water damage?
Only after materials are fully dried and repaired. Painting too soon traps moisture.
Understanding Ice and Snow Damage: A Homeowner’s Guide
Understanding Ice and Snow Damage: A Homeowner’s Guide
A comprehensive resource on identifying structural stress, mitigating ice dams safely, and preventing long-term property damage.
1. The Science of Ice Dams
Ice dams are not caused by the weather alone; they are a symptom of a building envelope failure. Understanding the mechanics is essential for proper remediation.
How They Form
An ice dam occurs when there is a temperature differential between the upper portion of the roof and the eaves.
- Heat Loss: Warm air leaks from the living space into the attic due to poor insulation or air sealing.
- Melt: This warm air heats the underside of the roof deck, melting the snow on the upper roof.
- Flow: The meltwater runs down the roof under the insulating blanket of snow.
- Refreeze: When the water reaches the eaves (which overhang the house and are not heated by the attic), it freezes.
- Accumulation: As this cycle repeats, a ridge of ice forms, trapping subsequent meltwater. This water pools and eventually seeps under the shingles/flashing and into the home.
2. Evaluating Snow Load Risk
While most residential roofs are designed to withstand significant weight (typically 20–40 lbs per square foot in snow-prone regions), specific conditions can exceed these limits.
Understanding Snow Weight
The danger depends on the density of the snow, not just the depth:
- Fresh, Fluffy Snow: Weighs approximately 3–5 lbs per square foot.
- Packed/Wet Snow: Weighs approximately 12–20 lbs per square foot.
- Ice: Weighs approximately 57 lbs per square foot.
- Auditory cues: Loud popping, creaking, or cracking noises coming from the roof or attic rafters.
- Visual cues: Sagging along the roof ridgeline.
- Interior indicators: Doors or windows that suddenly stick or will not close; new cracks in drywall or plaster, particularly above door frames.
3. Emergency Mitigation Strategies
If water intrusion is occurring, immediate action is required to minimize damage to the interior structure. Safety is paramount; homeowners should never climb onto an icy roof.
Interior Relief (For Active Leaks)
If water is pooling in the ceiling (visible as a sagging paint blister or bulge):
Procedure: Place a catch bucket beneath the area. Using a screwdriver or awl, puncture the center of the bulge. This allows the water to drain in a controlled manner, relieving weight and preventing the drywall ceiling from collapsing.
Exterior Removal (The “Melt Channel” Method)
Do not use rock salt (sodium chloride) on roofs, as it is corrosive to metal fasteners and harmful to vegetation. Do not use impact tools (axes/hammers), as they will shatter frozen shingles.
The Calcium Chloride Technique:
- Fill a leg of nylon pantyhose with Calcium Chloride ice melt.
- Safely position the stocking vertically across the ice dam so it overhangs the gutter.
- The chemical reaction will generate heat and melt a channel through the ice, allowing trapped water to drain.
4. Long-Term Prevention: The “Cold Roof” System
Permanent prevention of ice dams requires addressing the root cause: attic temperature. The goal is to maintain a “Cold Roof,” where the roof deck temperature matches the outdoor temperature.
Step 1: Air Sealing (Critical)
Insulation alone is insufficient if warm air can bypass it. Common leakage points include:
- Around chimney chases and plumbing vent stacks.
- Recessed lighting fixtures (can lights).
- Attic hatches and drop-down stairs.
Step 2: Ventilation
A proper ventilation system uses the “Stack Effect” to wash the underside of the roof sheathing with cold outside air.
- Intake: Soffit vents allow cold air to enter at the eaves.
- Exhaust: Ridge vents allow warmer air to escape at the peak.
- Baffles: Ensure insulation does not block the airflow from the soffit vents.