admin
How To Dry Wet Carpet
Wet carpets can cause significant issues if not dealt with quickly. Letting water sit on your carpet can lead to mold growth, unpleasant odors, and even structural damage to your floors. This post walks through the steps for drying your carpets effectively and preventing further problems.
Identifying the Source of Water
Before starting the drying process, it’s crucial to identify where the water is coming from. Whether it’s a burst pipe, a leak, or flooding, stopping the source will help prevent further damage. Turn off the power in the affected areas to avoid electrical hazards.
Understanding Water Damage Categories
Water damage falls into three main categories:
- Category 1 (Clean Water): This comes from broken supply lines or faucets. It’s clean but still needs to be dealt with quickly.
- Category 2 (Gray Water): This water contains some contaminants, like from washing machines or dishwashers. It poses a higher risk than Category 1 water.
- Category 3 (Black Water): Highly contaminated water, such as sewage or floodwater. It poses serious health risks and should always be handled by professionals.
Step-by-Step Guide to Drying Wet Carpet
Step 1: Remove Excess Water
Start by removing as much water as possible using a wet/dry vacuum. If the area is smaller, you can use absorbent towels to soak up water manually.
Step 2: Create Airflow
Good air circulation is essential for drying. Use high-velocity fans or air movers to help speed up the drying process. Opening windows can also help create airflow, but make sure that the fans direct moist air out of the room.
Step 3: Use a Dehumidifier
High humidity will slow the drying process, so using a dehumidifier is a great way to speed things up. Dehumidifiers pull excess moisture from the air, making it easier for the carpet to dry faster.
Household Products to Aid in Drying
Baking Soda for Moisture and Odor
Baking soda can help absorb both moisture and odors. Sprinkle it generously over the wet carpet and leave it for at least 24 hours. Afterward, vacuum up the baking soda to remove any residual dampness and odors.
Preventing Mold
Mold can grow within 24 to 48 hours of your carpet getting wet. Once mold begins to grow, it can damage the carpet and padding and cause health problems. To prevent mold, dry the carpet as quickly as possible, create airflow, and reduce humidity using a dehumidifier.
When to Call a Professional
Sometimes, it’s best to leave the drying process to the professionals. Calling a professional water damage remediation service is a good idea if you’re dealing with large areas, prolonged exposure, or contaminated water. They have specialized equipment and expertise to ensure the area is thoroughly dried and cleaned.
Carpet Padding and Subfloor: Critical Areas to Check
It’s essential to check beneath the carpet after drying it. The carpet padding often retains water and can become a breeding ground for mold. In most cases, it’s best to replace the padding entirely. Also, the subfloor should be inspected to ensure no lingering moisture could cause structural damage.
FAQs About Drying Wet Carpets
- How long does it take to dry wet carpets? Depending on the extent of the water damage, carpets can take anywhere from 2 to 7 days to dry completely, especially if proper ventilation and dehumidification methods are used.
- Can I use a steam cleaner on wet carpets? Steam cleaners can sanitize the carpet, but you must ensure that the cleaner extracts moisture rather than pushing water deeper into the padding.
- What are the signs of mold growth in wet carpets? Musty odors, discoloration, and allergy-like symptoms in household members can indicate mold growth.
- Is it safe to leave wet carpets to dry naturally? Allowing carpets to air dry without intervention can lead to mold and mildew growth especially underneath, causing further damage and potential health risks.
Basement Water Damage Repair: What to Do, What It Means, and How to Fix It
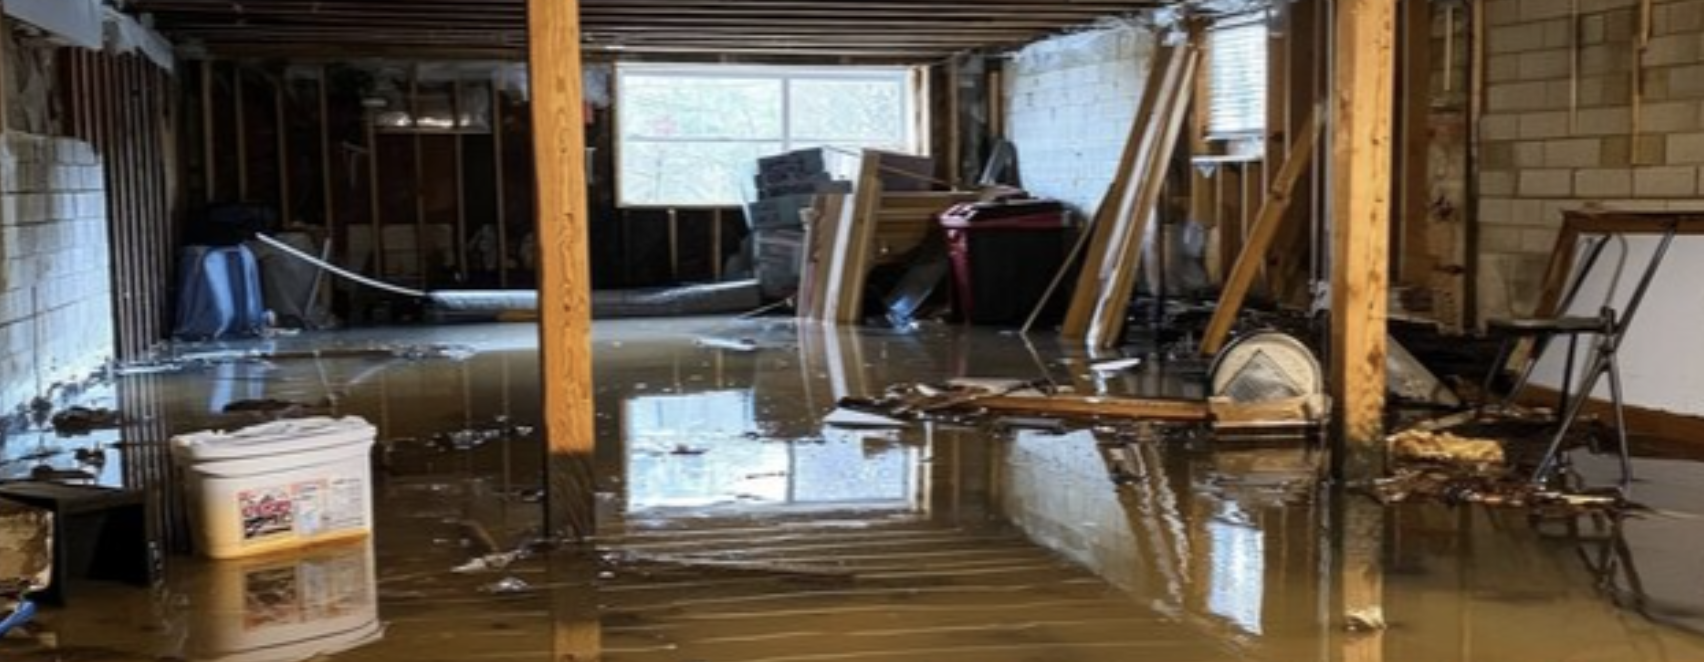
If you’re searching for basement water damage repair, something already went wrong. Maybe water is still present, maybe it just receded, or maybe you’re staring at soaked carpet, stained walls, or a musty smell that wasn’t there yesterday.
The good news: basement water damage is usually repairable.
The bad news: what you do in the first 24–48 hours determines whether this is a cleanup or a much bigger rebuild.
This guide walks you through what caused the damage, what to do immediately, what “repair” actually involves, and when it’s time to bring in professionals.
What Causes Basement Water Damage?
Most basement water damage comes from one of these situations:
Burst or Frozen Pipes
Common in winter or older homes. Water can spread fast and soak walls, flooring, and insulation before it’s noticed.
Sump Pump Failure
If the pump fails during heavy rain or a power outage, water can flood the basement quickly.
Heavy Rain or Groundwater Seepage
Water enters through foundation cracks, window wells, or poorly graded soil around the home.
Sewer or Drain Backup
Floor drains or toilets overflow due to blockages or overwhelmed municipal systems. This is one of the most serious scenarios.
Water Heater or Appliance Failure
A ruptured water heater, washing machine hose, or utility sink can release a surprising amount of water.
Identifying what caused the damage matters because it affects safety, cleanup methods, insurance coverage, and how repairs are handled.
First Things First: Safety and Immediate Actions
Before worrying about repairs, protect yourself and your home.
-
If water is near outlets or appliances, shut off electricity to the basement
-
Do not walk through standing water if power may still be on
-
Wear gloves and boots, especially if the water may be contaminated
-
Keep children and pets out of the area
-
Stop the source of water if possible (shut off supply, stop appliance use)
Avoid trying to “push through” the cleanup if there’s any safety risk.
What Basement Water Damage Repair Actually Means
Many people think repair just means drying things out. In reality, proper basement water damage repair usually involves several steps:
-
Water extraction (removing standing water)
-
Structural drying (floors, walls, framing, concrete)
-
Removal of damaged materials (carpet, padding, drywall, insulation)
-
Cleaning and sanitizing affected areas
-
Mold prevention or remediation, if needed
-
Rebuilding or restoration (drywall, flooring, baseboards)
Important distinction:
-
Cleanup removes water
-
Repair restores the structure safely
-
Restoration puts the space back together
Skipping steps often leads to mold, odor, or repeat damage.
What Kind of Water Are You Dealing With?
This is one of the most important questions — and most homeowners don’t realize it matters.
Clean Water
-
Burst pipes
-
Appliance leaks
-
Water heater failures
Lowest risk if addressed quickly.
Gray Water
-
Washing machine overflow
-
Sink or shower backups
Contains contaminants and requires disinfection.
Black Water
-
Sewer backups
-
Toilet overflows
-
Floodwater from outside
This is a health hazard. Porous materials usually must be removed, and professional cleanup is strongly recommended.
The dirtier the water, the more aggressive the repair process needs to be.
Why the First 24–48 Hours Matter So Much
Water damage gets worse with time, even if the water is gone.
-
Mold can begin growing in 24–48 hours
-
Drywall and insulation trap moisture behind walls
-
Concrete can stay wet for weeks
-
Odors can become permanent
-
Insurance claims can be affected if mitigation is delayed
Fast action often saves money and prevents long-term problems.
Can You Handle Basement Water Damage Yourself?
DIY May Be Reasonable If:
-
The water was clean
-
The affected area is small
-
The damage was caught immediately
-
No drywall, insulation, or framing is wet
Professional Repair Is Needed If:
-
Sewage or drain backup is involved
-
Water soaked walls or ceilings
-
Standing water remained longer than 24 hours
-
You notice musty smells or discoloration
-
Mold is visible or suspected
-
The source of the water isn’t clear
Trying to “wait it out” is one of the most common and costly mistakes.
Insurance and Cost Considerations
Insurance coverage depends on the cause:
-
Sudden pipe bursts are often covered
-
Groundwater flooding usually requires flood insurance
-
Sewer backups are covered only if you have a rider
-
Slow leaks are often denied
Important tips:
-
Document damage with photos and videos
-
Start mitigation immediately
-
Save receipts
-
Don’t throw items away before documenting them
Delays can reduce or complicate claims.
How Long Basement Water Damage Repair Takes
Timelines vary, but generally:
-
Water extraction: same day
-
Drying: 3–7 days
-
Material removal: 1–3 days
-
Repairs/restoration: days to weeks, depending on severity
Sewage contamination, mold growth, or structural damage can extend timelines.
Preventing Basement Water Damage in the Future
Once repairs are complete, prevention matters.
-
Inspect and maintain sump pumps (add battery backup)
-
Improve exterior drainage and grading
-
Seal foundation cracks
-
Install a backwater valve
-
Use a basement dehumidifier
-
Address recurring moisture issues early
Repairing damage without fixing the cause often leads to repeat problems.
When to Get a Professional Inspection
Consider an inspection if:
-
You’re unsure how far water traveled
-
Walls or floors feel damp days later
-
Odors persist
-
You want documentation for insurance
-
The basement floods repeatedly
A proper assessment looks beyond what’s visible.
Common Questions About Basement Water Damage Repair
How fast does mold grow after water damage?
Often within 24–48 hours in damp conditions.
Can concrete dry on its own?
Eventually, but it can stay wet for weeks without proper drying.
Is basement flooding always expensive to fix?
Not if addressed quickly — delays drive up costs.
Can you paint over water damage?
Only after materials are fully dried and repaired. Painting too soon traps moisture.
What Does a Septic Inspection Look Like?
As a homeowner with a septic system, you understand its crucial role in wastewater management. But do you really know what happens during a septic inspection? Regular inspections are more than just a maintenance chore; they invest in your property, your peace of mind, and the environment. Let’s uncover the step-by-step septic inspection process and why it’s so vital.
The Importance of Regular Septic Inspections
A septic system is an underground, self-contained wastewater treatment marvel commonly used in homes that are not connected to municipal sewers. It treats wastewater and returns it safely to the environment. Regular inspections prevent system failures, costly repairs, and potential environmental contamination. It is a health checkup, ensuring your system stays in top shape.

Conventional Septic Systems: The Tried and True
These are the most common types of septic systems, often found in established neighborhoods. They rely on simple gravity to move wastewater through the system:
- Septic Tank: This underground chamber holds wastewater, allowing solids to settle and grease to float. The partially treated liquid (effluent) then flows to the drainfield.
- Drainfield: A network of perforated pipes buried in a gravel bed, the drain field slowly releases effluent into the surrounding soil for final treatment.
- Variations: Conventional systems can be further classified into gravity or pressure distribution systems. Pressure distribution uses a pump to distribute effluent more evenly.
Pros:
- Simple and Reliable: Their straightforward design and gravity-based operation make them generally low-maintenance.
- Cost-Effective: Installation and maintenance costs tend to be lower than alternative systems.
- Widely Available: Most septic professionals are familiar with conventional systems.
Cons:
- Land Requirements: The drain field requires ample space, which may not be feasible in areas with high water tables or limited land.
- Soil Sensitivity: They require suitable soil conditions for proper effluent absorption.
Alternative Septic Systems: Innovation for Challenging Sites
When conventional systems aren’t an option due to site constraints or environmental concerns, alternative systems step up. These innovative solutions offer flexibility and can be tailored to specific needs:
- Aerobic Treatment Units (ATUs): These systems use oxygen to enhance the breakdown of waste, producing cleaner effluent. They are ideal for sensitive environments or areas with limited space.
- Mound Systems: When the natural soil is unsuitable, mound systems create a raised drainfield above ground level.
- Sand Filter Systems: These systems use sand filtration and pumps to treat and disperse effluent, and they are particularly useful in areas with poor soil or high water tables.
Pros:
- Site Flexibility: They can be adapted to challenging sites where conventional systems wouldn’t work.
- Environmental Benefits: Some alternative systems, like ATUs, produce cleaner effluent, minimizing environmental impact.
Cons:
- Higher Costs: Installation and maintenance are more expensive than conventional systems.
- Specialized Knowledge: They often require specialized maintenance and service from trained professionals.
Pre-Inspection To-Do List
Help the inspector do their job efficiently by preparing beforehand:
- Records Roundup: Gather any available information about your septic system, such as maintenance records, as-built drawings, and previous inspection reports.
- Access Granted: Clear any obstructions around the septic tank and drain field. Ensure lids are accessible and the areas are free of debris or vegetation.
Unveiling the Inspection Process
The inspection covers various critical components of your system:
Septic Tank:
- Structural Integrity: Inspectors look for cracks, chips, rot, or weathering that could compromise the tank’s structure.
- Water Level: They check the water level to ensure it’s not overflowing or backing up, which could indicate a problem with the drain field.
- Solids Levels: Using a sludge judge, they measure the scum and sludge layers to determine if the tank needs pumping.
- Baffles: They assess the condition of the baffles, ensuring they are intact, not clogged, and positioned correctly to prevent solids from entering the outlet pipe.
Distribution Box (D-box):
- Outlets and Openings: The inspector examines these for damage or restrictions that could impede the flow of wastewater.
- Structural Integrity: They check for cracks, leaks, or other signs of damage that could compromise the box’s functionality.
- Levelness: The D-box should be level to ensure even wastewater distribution to the drain field lines.
- Surrounding Area: The inspector also looks for wetness or sinkholes around the D-box, which could indicate leaks or drainage issues.
Drain Field (Leach Field):
- Visual Inspection: They look for signs of system failure, such as cesspools, soggy ground, or standing water (especially green or black water, which could indicate mold).
- Water Distribution: They may flush toilets and run water to observe the water pressure and ensure even distribution in the drain field.
- Drainage: In wet weather, they may check how much water flows back into the tank from the D-box and finger system, which could indicate a failing drain field.
Common Septic System Issues and Their Prices
A septic inspection can uncover various issues, some minor and easily fixable, while others require more extensive and costly solutions. Awareness of these potential problems and their associated repair costs can help you budget for maintenance and make informed decisions about your septic system’s health.
Septic Tank Troubles:
- Cracked Tank: Whether caused by age, ground shifts, or tree roots, a cracked tank can lead to leaks and contamination of your property. Repairing a crack might be possible in some cases, but a complete tank replacement is often necessary.
- Cost: $500 – $4,000 for repairs, $3,000 – $20,000 for replacement depending on the tank’s size and material.
- Damaged Walls: Similar to cracks, wall damage can result from various factors, compromising the tank’s integrity.
- Cost: $500 – $4,000 for repairs, but can be significantly higher for extensive damage.
- Tank Overflows: If the tank isn’t pumped regularly, solids can build up and cause backups in your home – a messy and unpleasant situation!
- Cost: $250 – $800 for pumping, plus additional costs if there’s underlying damage like root intrusion.
- Tank Doesn’t Drain: Blockages from sludge or roots can obstruct drainage, leading to backups and potential system failure.
- Cost: $200 – $5,000 depending on the cause and extent of the blockage. Sometimes, a simple hydro-jetting can clear the clog, but other times pipe or drain field replacement may be needed.
Distribution Box Dilemmas:
- Faulty D-Box: A damaged or malfunctioning D-box can disrupt the even flow of wastewater to the drain field, potentially causing backups or uneven saturation in the drain field.
- Cost: $500 – $1,500 for replacement.
Drainfield Disasters:
- Swampy or Smelly Drainfield: This indicates poor effluent absorption, often due to clogs, soil compaction, or system overload. This can lead to backups and potential health hazards.
- Cost: $2,000 – $10,000 for repairs or replacement. Rejuvenation techniques like aeration or hydro-jetting may be possible in some cases, but full replacement is sometimes necessary.
- Leach Field Leakage: Leaks at one end of the field could signify damage or blockages. Addressing this promptly is vital to prevent further contamination.
- Cost: $1,500 – $20,000 for repairs, with potential additional costs for excavation and landscaping.
Other Costly Culprits:
- Pump Failure: If your system uses a pump, it will eventually need replacement due to wear and tear.
- Cost: $600 – $2,000 for replacement, including labor.
- Invasive Roots: Tree and shrub roots can wreak havoc on pipes and the tank, leading to blockages and damage.
- Cost: $1,000 – $5,000 or more for root removal, depending on the extent of the damage and necessary repairs.
- Undersized System: An undersized system can’t handle the wastewater volume from your household, causing frequent backups and premature failure.
- Cost: $5,000 – $25,000 or more for a new system, depending on size and local regulations.
- Clogged or Damaged Baffles: These components help control the flow of solids and scum, preventing clogs in the outlet pipe.
- Cost: $200 – $600 for baffle repair or replacement.
- Low Bacteria Levels: Aerobic Treatment Units need adequate bacteria for optimal function. Replenishing bacteria may be necessary periodically or after system inactivity.
- Cost: $100 – $500 for bacteria addition.
When are Septic Inspections Required, and Who Foots the Bill?
While the National Association of Certified Home Inspectors recommends annual septic inspections, there are specific situations when inspections are necessary or even mandated:
- Real Estate Transactions: When buying or selling a home with a septic system, an inspection is often a requirement from the buyer’s lender or local regulations. This safeguards both parties, ensuring the system is functioning properly and any potential issues are disclosed upfront.
- Signs of Trouble: If you notice slow drains, gurgling sounds, foul odors, or lush patches in your yard, it’s a red flag that your septic system might be in distress. An immediate inspection is crucial to diagnose and address the issue before it escalates into a costly repair.
The Cost of an Inspection
A typical septic inspection costs between $100 and $500, depending on the complexity of the system and your location. If the inspector needs to uncover the tank, expect an additional fee.
Who Pays for Inspections and Repairs?
In most real estate transactions, the buyer typically pays for the inspection as part of their due diligence. However, some states or municipalities require the seller to cover the inspection cost. It’s always best to consult your real estate agent or local regulations to confirm who’s responsible in your area.
Negotiations are often involved when it comes to repairs. If issues are uncovered during the inspection, the buyer and seller can discuss who will cover the repair costs. Sometimes, the seller may agree to complete the repairs before closing, while other times, an escrow holdback can be set up to ensure the repairs are completed after the sale.
Proactive Inspections: A Smart Investment
Even if not mandated, proactive septic inspections are a wise investment. By addressing potential issues early, you can avoid major headaches and unexpected expenses down the line. Think of it as preventative healthcare for your septic system – a little care and attention today can save you a lot of trouble tomorrow.
Understanding Ice and Snow Damage: A Homeowner’s Guide
Understanding Ice and Snow Damage: A Homeowner’s Guide
A comprehensive resource on identifying structural stress, mitigating ice dams safely, and preventing long-term property damage.
1. The Science of Ice Dams
Ice dams are not caused by the weather alone; they are a symptom of a building envelope failure. Understanding the mechanics is essential for proper remediation.
How They Form
An ice dam occurs when there is a temperature differential between the upper portion of the roof and the eaves.
- Heat Loss: Warm air leaks from the living space into the attic due to poor insulation or air sealing.
- Melt: This warm air heats the underside of the roof deck, melting the snow on the upper roof.
- Flow: The meltwater runs down the roof under the insulating blanket of snow.
- Refreeze: When the water reaches the eaves (which overhang the house and are not heated by the attic), it freezes.
- Accumulation: As this cycle repeats, a ridge of ice forms, trapping subsequent meltwater. This water pools and eventually seeps under the shingles/flashing and into the home.
2. Evaluating Snow Load Risk
While most residential roofs are designed to withstand significant weight (typically 20–40 lbs per square foot in snow-prone regions), specific conditions can exceed these limits.
Understanding Snow Weight
The danger depends on the density of the snow, not just the depth:
- Fresh, Fluffy Snow: Weighs approximately 3–5 lbs per square foot.
- Packed/Wet Snow: Weighs approximately 12–20 lbs per square foot.
- Ice: Weighs approximately 57 lbs per square foot.
- Auditory cues: Loud popping, creaking, or cracking noises coming from the roof or attic rafters.
- Visual cues: Sagging along the roof ridgeline.
- Interior indicators: Doors or windows that suddenly stick or will not close; new cracks in drywall or plaster, particularly above door frames.
3. Emergency Mitigation Strategies
If water intrusion is occurring, immediate action is required to minimize damage to the interior structure. Safety is paramount; homeowners should never climb onto an icy roof.
Interior Relief (For Active Leaks)
If water is pooling in the ceiling (visible as a sagging paint blister or bulge):
Procedure: Place a catch bucket beneath the area. Using a screwdriver or awl, puncture the center of the bulge. This allows the water to drain in a controlled manner, relieving weight and preventing the drywall ceiling from collapsing.
Exterior Removal (The “Melt Channel” Method)
Do not use rock salt (sodium chloride) on roofs, as it is corrosive to metal fasteners and harmful to vegetation. Do not use impact tools (axes/hammers), as they will shatter frozen shingles.
The Calcium Chloride Technique:
- Fill a leg of nylon pantyhose with Calcium Chloride ice melt.
- Safely position the stocking vertically across the ice dam so it overhangs the gutter.
- The chemical reaction will generate heat and melt a channel through the ice, allowing trapped water to drain.
4. Long-Term Prevention: The “Cold Roof” System
Permanent prevention of ice dams requires addressing the root cause: attic temperature. The goal is to maintain a “Cold Roof,” where the roof deck temperature matches the outdoor temperature.
Step 1: Air Sealing (Critical)
Insulation alone is insufficient if warm air can bypass it. Common leakage points include:
- Around chimney chases and plumbing vent stacks.
- Recessed lighting fixtures (can lights).
- Attic hatches and drop-down stairs.
Step 2: Ventilation
A proper ventilation system uses the “Stack Effect” to wash the underside of the roof sheathing with cold outside air.
- Intake: Soffit vents allow cold air to enter at the eaves.
- Exhaust: Ridge vents allow warmer air to escape at the peak.
- Baffles: Ensure insulation does not block the airflow from the soffit vents.
How to Clean Up After a Fire: The Step-by-Step Safety Guide
If you are reading this standing in a smoke-filled room, stop.
Take a deep breath (outside). Fire damage is traumatic, and the urge to immediately grab a wet rag and start scrubbing is overwhelming.
Do not do that.
Cleaning fire damage is not like cleaning a dirty kitchen. It involves toxic carcinogens, acidic residues, and microscopic particles that hide in wall cavities. If you clean it wrong—specifically, if you use water on soot before removing it dry—you will permanently set the stain and the smell into your walls.
This guide is your triage manual. It will help you decide what you can save, what you must toss, and how to clean up safely without making the damage worse.
Phase 1: The “Do Not Touch” Rules (Safety First)
Before you pick up a sponge, you need to secure the scene.
1. Don’t touch soot with bare hands.
The natural oils in your skin will react with the soot and “set” it into walls or upholstery. Once this happens, it is nearly impossible to remove. Always wear gloves.
2. Turn OFF your HVAC immediately.
If you run your A/C or heater, you are sucking soot and smoke particles into your ductwork and blowing them into rooms that weren’t even damaged. Keep the system off until a professional inspects it.
3. Don’t wash your clothes in your home machine.
Smoke-damaged clothes can contaminate your washing machine, making your next ten loads smell like a campfire. Take them to a dry cleaner or a laundromat dedicated to heavy-duty cleaning.
Phase 2: The Assessment (DIY vs. Professional)
Not all fires are the same. Use this checklist to decide if you can handle this yourself.
You can likely DIY if:
-
The fire was small and contained (e.g., a stovetop flare-up).
-
The soot is “dry” (dusty) and covers a small area.
-
There is no structural damage (charred studs, weak floors).
Call a Professional immediately if:
-
The “Protein” Fire: You burned meat, fish, or beans. This leaves an invisible, sticky, pungent residue that is incredibly difficult to remove without chemical sealers.
-
Water Damage: If firefighters used hoses, you have 24-48 hours before mold begins. This is a complex restoration job.
-
Plastics/Chemicals: If you burned plastic, the soot is highly acidic and toxic. Do not breathe this.
Phase 3: The Toolkit (What You Need)
Do not use standard household cleaners yet. You need specific tools to break the chemical bond of the soot.
-
N95 Masks: Soot particles are microscopic and carcinogenic. Protect your lungs.
-
Dry Chemical Sponges: (Also known as “Soot Erasers”). This is the most important tool. They look like a brick of yellow rubber. Do not use a regular kitchen sponge.
-
TSP (Tri-Sodium Phosphate): A heavy-duty degreaser found at hardware stores.
-
HEPA Vacuum: A standard shop vac will just blow the fine soot particles back into the air. You need a sealed HEPA filter.
Phase 4: The Cleaning Process (Step-by-Step)
Step 1: The “Hover” Vacuum
Use your HEPA vacuum with the upholstery attachment. Hold the nozzle slightly above the soot (do not press it into the surface). You want to suck up the loose particles before you touch them.
Step 2: The Dry Sponge (The Critical Step)
Do not use water yet.
Take your Dry Chemical Sponge and press it firmly against the wall. Pull it down in a straight line.
-
Do not scrub. Scrubbing grinds the soot into the pores of the drywall.
-
Flip often. As the sponge turns black, slice off the dirty layer with a razor blade or flip it to a clean side.
-
Do not rinse the sponge. These sponges are meant to be used dry.
Step 3: The Wet Clean
Once the visible soot is gone, you can wash the surface.
-
Mix TSP with warm water (wear gloves, TSP is strong).
-
Wash walls from the bottom up. (If you wash top-down, dirty water trickles over dry soot, creating streaks that are hard to fix).
-
Rinse with clear water and dry immediately with a clean towel.
Phase 5: The “Hidden” Spots (Where the Smell Hides)
You cleaned the walls, but the smell is still there. Why? Because smoke travels where your sponge didn’t. Here are the spots most people miss:
-
The Outlets: Smoke travels through wall cavities and settles behind your light switches and outlet covers. Unscrew the faceplates (carefully)—you will likely see a black ring of soot on the back.
-
Lightbulbs: Soot settles on bulbs. When you turn the light on later, the heat “bakes” the soot, releasing the odor all over again. Throw away your old lightbulbs.
-
Top of Door Frames: Get on a ladder. Smoke rises, so the tops of your door frames and the inside lips of your upper kitchen cabinets are likely covered in soot.
Phase 6: Save or Toss? (The Cheat Sheet)
Fire damage is harsh. Sometimes, the cost of cleaning an item is higher than replacing it.
| Item | Verdict | Why? |
| Open Food | TOSS | Heat expands jars/cans, letting smoke enter. Do not risk eating chemicals. |
| MDF Furniture | TOSS | Particle board absorbs smoke like a sponge. It is nearly impossible to seal. |
| Real Wood | SAVE | Can often be cleaned with oil soap or refinished. |
| Mattresses | TOSS | Smoke penetrates the foam core. You cannot clean the inside. |
| Electronics | MAYBE | Soot is acidic. If inside your PC/Console, it can cause a short. Clean with 90% Isopropyl Alcohol, not water. |
A Final Note on Insurance
Before you clean a single inch, take photos.
If you clean the soot perfectly, the insurance adjuster won’t see the extent of the damage. Document everything first.
Still smelling smoke?
If you have scrubbed everything and the odor persists, the smoke particles have likely penetrated the insulation or the pores of the wood framing. This requires Thermal Fogging or Ozone Treatment to neutralize.